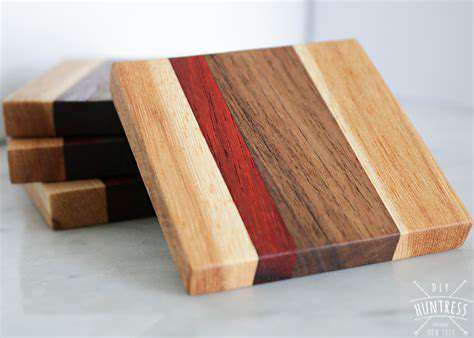
Simple DIY Wood Coasters
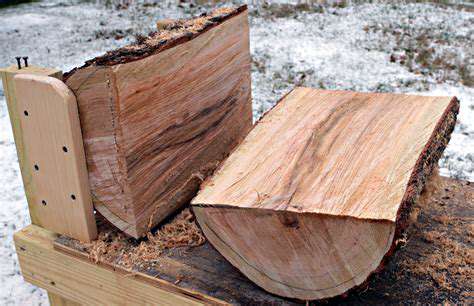
Preparing Your Wood: Cutting and Shaping
Understanding the Importance of Accurate Cuts
Getting your cuts just right matters a lot when working with wood, whether you're making fancy furniture or building something sturdy. If your cuts are off, you'll run into problems like weak joints or pieces that don't fit together properly. Taking your time to measure carefully and using steady techniques helps everything come together smoothly so your project turns out great.
Picking the proper tools makes a big difference too. Different woods work better with certain saws and blades, and using the right ones means you'll get cleaner cuts while staying safer.
Choosing the Right Saw for the Job
Not all saws work the same way. Some are better for straight cuts while others handle curves or thick pieces better. For small jobs, a basic hand saw might do, but bigger projects usually need something like a circular saw or table saw.
Think about what kind of wood you're using and how big your cuts need to be before picking your saw. Matching the tool to the task makes your work easier and gives you better results.
Measuring and Marking for Accurate Cuts
Good cuts start with good marks. If your measurements are wrong, nothing will fit right later. Always double-check your numbers and make clear lines before cutting.
Use a solid ruler or tape measure to get things exact, then mark your lines with something easy to see like a sharp pencil. This simple step prevents lots of headaches down the road.
Safety Precautions When Cutting Wood
Working with sharp tools means you can't skip safety. Things can go wrong fast, so wearing protection like goggles and gloves really matters. Keep your workspace tidy too.
Before you start cutting, check that your area is clear and all safety features on your tools are working. These basic steps help prevent accidents so you can focus on your project.
Preparing the Wood for Different Cuts
How you get wood ready depends on what kind of cut you're making. Straight cuts need different prep than angled ones. Knowing these differences helps everything go smoother.
Pay attention to which way the wood grain runs too. Cutting with the grain helps prevent ugly splits and gives you cleaner edges.
Adding Personalization: Finishing Techniques and Designs
Finishing Techniques for a Polished Look
Great finishes turn simple wood pieces into something special. Clear sealants protect while showing off the wood's natural look. Try several thin coats of water-based polyurethane, sanding lightly between coats, for a durable shine that lasts.
Want something more rustic? Tinted varnishes or glazes add color and depth. Just remember - good prep work makes all the difference in how professional your final piece looks.
Creative Designs to Make Your Coasters Unique
Your coasters can show off your style beyond just the wood. Try mixing in colorful resin or different wood types for eye-catching patterns. Simple carvings or etchings add personal flair too.
Stencils let you add detailed designs or meaningful words. These small touches transform basic coasters into conversation starters that reflect your personality.
Personalizing Your Coasters with Intricate Details
Little extras make big impressions. Tiny stained glass pieces set into the wood catch the light beautifully. Small metal accents, maybe with engraved initials or designs, add special meaning.
Adding Color and Texture for Visual Appeal
Don't be afraid to play with color! Stains or paints in your favorite shades make coasters pop. Mixing different wood tones creates interesting patterns naturally.
For something truly unique, try embedding small natural items like stones or dried flowers. These organic touches bring warmth and character to your creations.
Finishing Touches: Sealing and Protecting Your Coasters
Sealing Your Coasters for Long-Lasting Beauty
Protecting your hard work with proper sealing keeps coasters looking great. Wood-specific sealants guard against stains while enhancing the grain. Multiple thin coats work better than one thick one - just follow the product directions carefully. This step means your coasters stay beautiful through years of use.
Sealing does more than look nice - it creates a barrier against spills and everyday wear. You'll spend less time worrying about stains and more time enjoying your handmade pieces.
Protecting Your Coasters from the Elements
Extra protection helps in damp areas. A clear polyurethane topcoat adds water resistance for humid kitchens or outdoor use. For coasters that might touch food, food-safe sealants keep things clean and hygienic.
These extra steps take time but pay off in durability. Well-protected coasters handle daily use while keeping their good looks season after season.
Displaying Your DIY Wood Coasters: Styling Tips and Ideas
Displaying Your Finished Coasters
How you show off your coasters matters as much as making them. Pick spots that match your home's style - coffee tables, kitchen counters, even bathroom vanities can work. Grouped together on a nice tray or stand, they become a decorative feature, not just something functional.
Choosing the Right Surface
Smooth surfaces like wood or stone make great backdrops. Avoid anything that might scratch or stain your coasters over time. Decorative trays add style while protecting both coasters and furniture.
Using Decorative Elements
Small plants, candles, or other decor items create lovely arrangements around your coasters. These extras draw the eye and make your display more inviting. Just keep colors and textures balanced for a pulled-together look.
Lighting and Positioning
Good lighting shows off your work best. Natural light highlights wood grain beautifully. If using lamps, soft light works better than harsh overheads. Try different spots until you find where your coasters look their best.
Presentation and Organization
Group similar coasters together for a tidy look. Small boxes or stands keep sets organized and ready to use. A neat display makes your coasters more appealing and practical at the same time.
Read more about Simple DIY Wood Coasters


Hot Recommendations
-
*Best Sci Fi Books to Read in 2025
-
*How to Start a Reading Journal
-
*Guide to Collecting Vinyl Records by Genre
-
*Guide to Self Publishing Your Book
-
*Guide to Reading More Books
-
*How to Solve a Megaminx Fast
-
*Guide to Identifying Edible Plants While Hiking (Use Caution!)
-
*How to Solve a 5x5 Rubik's Cube
-
*Guide to Building Advanced Lego Structures
-
*How to Capture Star Trails Photography