How to Capture Star Trails Photography
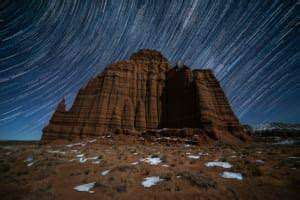
Post-Processing for Stellar Results
Understanding the Importance of Post-Processing
Post-processing is an essential step in capturing stunning star trail photography, transforming raw images into breathtaking displays of celestial movement. It's not just about fixing minor imperfections; it's about bringing out the subtle nuances of the star trails, enhancing the sense of depth and motion, and ultimately creating an image that truly conveys the awe-inspiring beauty of the night sky. This stage allows for adjustments to exposure, color, and contrast, enabling you to fine-tune the final image to your vision and artistic style. Proper post-processing is the key to transforming a good photo into a truly exceptional one.
Without careful post-processing, your star trails might appear flat, washed out, or lack the dynamic range needed to showcase the celestial dance. It's a vital part of the creative process, allowing you to craft an image that captures not only the technical aspects of the scene but also the emotional impact of the experience.
Exposure Adjustments
Careful exposure control during shooting is crucial, but post-processing allows for fine-tuning. Adjusting exposure values in post-production can compensate for minor errors in your initial settings and bring out the faint details of the night sky. This includes increasing or decreasing the overall brightness to match the desired aesthetic, while keeping the highlights and shadows in balance for a more visually appealing image.
Overexposed images can lose the subtle gradations of color and detail in the star trails. Underexposed images might result in a dark, flat image, making it difficult to capture the beauty of the celestial dance. Exposure adjustments in post-processing allow you to recover details and bring out the nuances of the trails.
Color Balance and Temperature
The color palette of your star trail image plays a significant role in conveying the mood and atmosphere of the scene. Post-processing allows you to adjust the color balance and temperature to create a more vibrant or a more subdued look. Warmer tones can evoke a sense of cozy intimacy while cooler tones can emphasize the vastness and coldness of space. Experimenting with color adjustments will allow you to create images that match your vision and personal style.
Noise Reduction
Long exposures, especially in low-light conditions, often introduce noise into the image. Noise reduction techniques in post-processing are crucial for removing these imperfections and improving the overall clarity of your star trails. Different software offers various noise reduction tools, and understanding how to use them effectively is key to achieving clean, sharp images. Using the right tools will help you create a smoother, more refined image with a focus on the star trails themselves.
Sharpness and Detail Enhancement
Post-processing allows you to enhance the sharpness of the stars and the details within the star trails. Applying sharpening filters can bring out the subtle details of each star, making the image more engaging and visually appealing. This step is crucial for making the individual stars stand out against the backdrop of the trails, showcasing the intricate beauty of the celestial dance.
Creative Adjustments and Effects
Post-processing is an opportunity to add creative flair to your star trails. Techniques like adding subtle color gradients, adjusting contrast, or applying light effects can transform the image from a technical record to a breathtaking work of art. It's essential to use these tools judiciously, ensuring that the adjustments enhance the image without overwhelming the natural beauty of the star trails. With experimentation, you can push the boundaries of your creativity and bring your vision to life through post-processing.
Batch Processing and Organization
When shooting a series of star trail images, post-processing each one individually can be time-consuming. Learning to use batch processing tools in your software can significantly speed up the workflow. This involves applying similar adjustments to a group of images simultaneously. This efficiency is crucial for managing a large volume of images. Properly organizing your post-processed images is equally important for future reference and easy access.
Read more about How to Capture Star Trails Photography


Hot Recommendations
-
*Best Sci Fi Books to Read in 2025
-
*How to Start a Reading Journal
-
*Guide to Collecting Vinyl Records by Genre
-
*Guide to Self Publishing Your Book
-
*Guide to Reading More Books
-
*How to Solve a Megaminx Fast
-
*Guide to Identifying Edible Plants While Hiking (Use Caution!)
-
*How to Solve a 5x5 Rubik's Cube
-
*Guide to Building Advanced Lego Structures
-
*How to Capture Star Trails Photography