How to Embroider Basic Stitches
The Fundamental Stitch
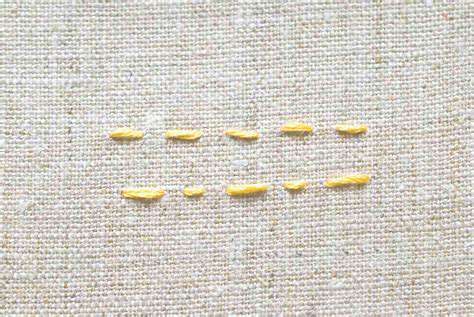
The running stitch, a seemingly simple stitch, forms the bedrock of many sewing techniques. It's a fundamental stitch used for a variety of tasks, from basting fabric pieces together temporarily to creating decorative lines. Understanding the running stitch is crucial for any aspiring sewer, as it lays the groundwork for more complex and decorative stitches.
Mastering the running stitch involves understanding the tension and rhythm of the needle's movement. A consistent stitch length and even spacing are key to a professional-looking result. This is a technique that can be easily practiced and perfected with a little patience and persistence.
Basic Needle and Thread Preparation
Before you begin, ensure your needle is sharp and appropriate for the fabric you're working with. A dull needle can cause skipped stitches and frustration. Use a thread color that complements your project and choose a thread that's strong enough to handle the fabric without breaking easily. The right thread is crucial for the stitch to hold up well, especially when it comes to heavier fabrics or projects that require durability.
Thread the needle correctly. This may seem simple, but a properly threaded needle is essential for a smooth and consistent stitch. A tightly wound thread or thread with a knot can cause problems and make the stitch look uneven. Proper preparation ensures a good start to your sewing journey.
The Basic Running Stitch Technique
Begin by holding the fabric taut with one hand. With the other hand, insert the needle from the back of the fabric to the front, about a quarter of an inch or a centimeter from the edge. Then, carefully pull the thread through, creating a small loop. Consistent tension is key to a neat and professional finish. The loop should have even spacing with no knots or irregularities.
Variations and Applications
The running stitch, while a basic stitch, has many variations. One variation involves using a different thread color or a thicker thread to create different effects. This can enhance the visual appeal of the project. Applying this simple stitch to various types of fabrics is a perfect way to experiment with different textures and aesthetics. You could use it to outline shapes or add decorative accents to your creations.
Maintaining Even Tension
Maintaining consistent tension while stitching is vital for a clean and professional look. To practice even tension, use a consistent pulling force on the thread throughout the stitching process. You can adjust the tension by changing the pressure you apply to the needle and thread. Regular practice with the running stitch is key to mastering this essential sewing skill. This skill will be useful in numerous projects, from simple repairs to complex designs.
Troubleshooting Common Issues
A skipped stitch or uneven stitching can be frustrating. If you're experiencing these issues, carefully inspect your needle, thread, and tension. Ensure the needle is sharp and the thread is properly threaded. Adjusting your tension is key to avoiding skipped stitches. If the problem persists, try practicing the technique on a scrap of similar fabric before moving on to your project.
The Back Stitch: Precision and Detail
Understanding the Back Stitch
The back stitch, a fundamental embroidery stitch, is characterized by its consistent, even texture and ability to create strong lines. It's a versatile stitch ideal for outlining shapes, creating decorative borders, and even filling small areas. Mastering the back stitch lays a crucial foundation for more complex embroidery projects, allowing you to confidently tackle intricate designs and achieve precise results. Understanding the basic mechanics and nuances of this stitch will significantly enhance your embroidery skills.
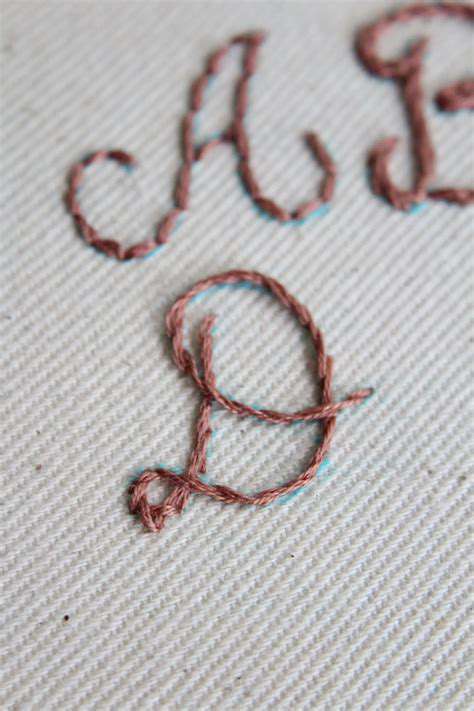
This stitch is particularly useful for creating clean, defined lines, making it excellent for outlining shapes, lettering, and even creating simple patterns. The consistent nature of the stitch allows for a smooth and predictable result, which is crucial for achieving a professional look in your embroidery.
Materials and Tools for Back Stitch Embroidery
To execute the back stitch effectively, you'll need a few essential materials and tools. A high-quality embroidery needle, appropriate for your chosen thread and fabric, is paramount. Selecting the right thread type, whether cotton, silk, or metallic, will impact the stitch's appearance and durability. A sturdy embroidery hoop is also necessary to keep your fabric taut and prevent puckering during the stitching process. Ensure your chosen fabric is suitable for embroidery, offering enough stability for the stitches without being too stiff or inflexible.
Additionally, having a good quality fabric that is appropriately sized for your project is essential. A good embroidery hoop will help maintain the fabric's tautness, preventing puckering and creating a clean, professional-looking stitch. Consider the type of thread you'll use as well, as different threads have varying thicknesses and textures, which might affect the stitch's appearance.
The Basic Back Stitch Technique
Begin by threading your needle with the desired embroidery floss. Hold the fabric taut within the embroidery hoop. Bring the needle up from the back of the fabric, slightly behind your intended stitch line. Next, bring the needle down through the fabric in front of the point where you brought it up. Pull the needle and thread through until the stitch is securely formed. This creates a small V shape. Repeat this process, ensuring consistent stitch spacing, to create your desired line or pattern.
Remember to maintain consistent stitch length and tension throughout the entire process. This will ensure a uniform look. Avoid pulling the thread too tight, which can distort the stitch, and too loose, which can make the stitch look uneven. The key to a good back stitch is practice and patience. Focus on creating a smooth, flowing line, and gradually you will develop a feel for the perfect stitch.
Variations and Applications of the Back Stitch
While the basic back stitch is versatile, it can be adapted for various embroidery techniques. Experiment with different stitch lengths to create varied textures. Combine it with other stitches, such as running stitch or French knots, to add depth and visual interest to your designs. The back stitch is a fundamental technique for creating outlines, borders, and fillings. You can use it to add intricate details or create simple, elegant lines, depending on the embroidery project.
You can also use the back stitch to create a solid filling by working in a consistent direction, creating a continuous line. This can be used to fill small shapes or intricate designs. It’s essential to consider the overall project and design aesthetic when deciding how to use the back stitch. Experimenting with the stitch's application will lead to a more comprehensive understanding of its potential.
Troubleshooting Common Back Stitch Issues
One common issue encountered when using the back stitch is uneven stitch length. This is often due to inconsistent pressure applied while pulling the thread. Regular practice and attention to your technique are key to resolving this issue. Another problem can be the appearance of puckering or distortion in the fabric. Ensuring the fabric is properly secured within the embroidery hoop and avoiding pulling the thread too tightly during stitching will help to prevent this problem. Understanding these common problems and their solutions will help you to create professional-looking embroidered pieces with confidence.
If your stitching is uneven, consider adjusting your grip on the needle, the tension of the thread, or the way you hold the fabric. If puckering occurs, try loosening the fabric in the embroidery hoop slightly to allow for better stitch flow. Careful observation of your work and adjusting your technique will ultimately lead to satisfying results and a more enjoyable embroidery experience.
Central sleep apnea (CSA) is a sleep disorder characterized by pauses in breathing during sleep, but unlike obstructive sleep apnea (OSA), these pauses are not caused by a physical obstruction in the airway. Instead, the brain fails to send the proper signals to the muscles that control breathing. This results in a lack of airflow, leading to periods of apnea, or absence of breathing. Recognizing the underlying cause of these breathing irregularities is crucial for effective treatment.
The Satin Stitch: Embellishing Your Designs
Satin Stitch Basics
The satin stitch, a fundamental embroidery technique, is renowned for its smooth, even surface. It's a versatile stitch that can be used to create a wide range of effects, from simple outlines to intricate fillings. This technique involves creating a series of closely spaced, parallel stitches, which, when closely worked, produce a nearly opaque surface. Mastering the satin stitch opens up a world of possibilities for embellishing your projects with a professional-looking finish. Learning this technique is a great starting point for many embroidery enthusiasts.
The consistency of the satin stitch is what sets it apart from other stitches. It allows for precise control over the final appearance of your work, enabling you to create detailed patterns and images with remarkable accuracy. The smooth, unbroken surface that results makes it ideal for filling in large areas of color or creating the illusion of smooth textures.
Creating Different Effects with Satin Stitch
Beyond the basic satin stitch, there are variations that add depth and dimension to your embroidery. Varying the stitch length, the direction of the stitching, and the tension of the thread are just a few of the ways to create different effects. Employing different thread colors for highlights and shadows, for instance, enhances the overall impact and complexity of the design. Experimentation is key to discovering your own unique style and techniques using the satin stitch.
One advanced technique involves using a combination of satin stitch with other embroidery stitches to add extra layers of detail and depth to your work. This adds an extra dimension to the piece and allows you to showcase your creativity and technical skills.
Using different thread weights and colors can significantly alter the project's appearance and feel. A lighter thread will create a delicate, almost ethereal effect, while a heavier thread will impart a richer, more substantial look.
Tools and Materials for Satin Stitch Embroidery
To achieve the best results with satin stitch, having the right tools and materials is crucial. High-quality embroidery floss is essential for a smooth and even stitch. Different floss weights and colors offer a wide range of options for creating various design elements. Selecting the right needle for your chosen thread type is also vital. A sharp needle will reduce the risk of breaking the thread and ensure a more efficient stitching process. Proper lighting is also essential for clearly seeing your work and maintaining accuracy.
Invest in a good quality embroidery hoop to keep your fabric taut and prevent puckering during stitching. A stable work surface and a comfortable posture are equally important for a productive and stress-free embroidery session. Additionally, a variety of fabric types can be used for satin stitch projects, from lightweight cotton to more structured linen. Choosing the right fabric will allow you to showcase your embroidery in the most appealing way.
Applying Satin Stitch in Various Projects
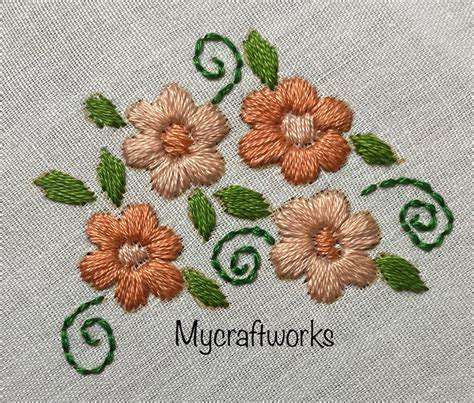
The versatility of the satin stitch allows its use in a wide array of embroidery projects. It's a favorite for creating detailed floral designs, intricate patterns, and intricate illustrations. With its ability to fill in large areas with smooth color, it's perfect for landscape or abstract designs, as well as for embellishing clothing or accessories. The stitch's ability to create a seamless surface makes it suitable for a multitude of different purposes.
From decorative pillowcases to stunning wall hangings, the possibilities are endless when incorporating satin stitch. The stitch is often used in conjunction with other embroidery techniques to bring out the best of each approach. Its smooth surface provides a perfect backdrop for other stitches, such as the French knots or backstitch, which enhance the overall visual appeal of the project.
The French Knot: Adding Dimension to Your Embroidery
Understanding the French Knot
The French knot, a fundamental embroidery stitch, is a tiny, textured loop that adds depth and visual interest to your projects. It's formed by wrapping the thread around the needle, then pushing the needle through the fabric, pulling the thread tight, and creating a small, tightly-packed knot on the surface. This technique, often used for filling in small areas or creating highlights, is a versatile tool in an embroiderer's arsenal, adding a unique dimension to your designs.
Mastering the French knot involves precision and a gentle touch. The size of the knot is directly related to the amount of thread wrapped around the needle before piercing the fabric. Experiment with different wrapping techniques to discover the perfect knot for your specific project and desired aesthetic. Practice makes perfect, and the satisfaction of creating a beautiful French knot will inspire further exploration in your embroidery journey.
Creating the Perfect French Knot
A critical aspect of creating a beautiful French knot is the initial wrapping of the thread. Wrap the thread around the needle's shaft, ensuring a consistent and even amount of wrapping. The tighter the wrapping, the more concentrated and defined the knot will be. The key is consistency in wrapping for consistent knot size. Practice this technique repeatedly to develop an eye for appropriate wrapping.
Once you've wrapped the thread, carefully position the needle and pierce the fabric. The needle should be held vertically, perpendicular to the fabric, for accurate placement of the knot. As you pull the thread through, keep a steady pressure to secure the knot. Avoid pulling too hard, as this can distort the knot's shape. A smooth, controlled motion is essential for a neat and professional finish.
Utilizing French Knots in Your Designs
The French knot's versatility makes it a powerful tool in various embroidery projects. It can be used to create detailed floral elements, textured backgrounds, or to highlight specific areas of your design. For example, use French knots to emphasize the petals of a flower or create a shaded effect in a landscape. The possibilities are endless, and the French knot is perfect for adding a touch of sophistication to any embroidery piece.
Consider the scale of your project when deciding how to use French knots. For large-scale projects, you may use them sparingly, concentrating the impact on focal points. In smaller projects, you can employ them more densely to create a rich, textured effect. Experimentation with different knot sizes and spacing will help you discover the best way to use French knots in your own unique designs.
Variations and Advanced Techniques
While the basic French knot is a solid foundation, there are several variations that can enhance your embroidery skills. For example, you can experiment with varying thread colors to create a more complex design. Varying the wrapping amount results in different knot sizes, which can be used to create depth and dimension. Mixing different thread colors and wrapping techniques will open up a whole new creative world for you.
Beyond the basic French knot, you can explore advanced techniques like the chain French knot, where multiple French knots are connected to form a chain-like effect. This technique can be used to create intricate details or outlines in your embroidery designs. The key is to learn how to control the tension of the thread throughout the whole process. Explore the possibilities and discover your signature style with these advanced techniques.
Hot Recommendations
-
*Best Sci Fi Books to Read in 2025
-
*How to Start a Reading Journal
-
*Guide to Collecting Vinyl Records by Genre
-
*Guide to Self Publishing Your Book
-
*Guide to Reading More Books
-
*How to Solve a Megaminx Fast
-
*Guide to Identifying Edible Plants While Hiking (Use Caution!)
-
*How to Solve a 5x5 Rubik's Cube
-
*Guide to Building Advanced Lego Structures
-
*How to Capture Star Trails Photography