Easy Knitting Patterns for Hats
Beginner-Friendly Cable Hat
Getting Started with Cable Hats
Cable hats bring texture and visual flair to knitting projects. While they may seem complex at first glance, the core cable stitches are surprisingly approachable. This guide simplifies the essential techniques, making them accessible for knitters at any skill level. With consistent practice, you'll soon craft warm, textured cable hats with confidence.
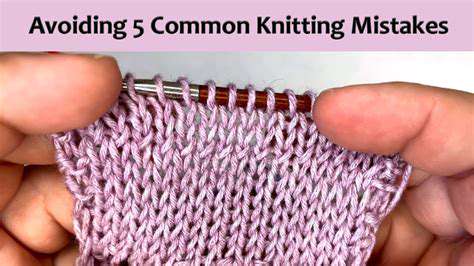
Before tackling cables, ensure you're comfortable with foundational knitting skills. Mastering cast-on, knit, purl, and increase/decrease stitches forms the backbone of successful cable work. Numerous video tutorials exist to help reinforce these basics if needed.
Selecting Yarn and Needles
Your yarn choice dramatically affects the final product. For winter warmth, bulky yarn creates substantial cables, while fingering weight yields delicate patterns. The fiber content matters too - wool blends offer excellent stitch definition.
Needle size should match your yarn weight. Always check the yarn label's recommended needle size to achieve proper gauge. This ensures your hat fits well and showcases the cables beautifully.
Essential Cable Stitches
Start with fundamental cable stitches like the 2/2 Cable (crossing two stitches over two). Practice these with scrap yarn before beginning your hat. Using a cable needle makes stitch crossing much easier for beginners.
Once comfortable, experiment with variations like the rope cable or honeycomb pattern. These build on basic techniques while adding visual complexity to your projects.
Understanding Cable Charts
Cable patterns often use visual charts with symbols representing different stitches. Take time to study the legend before starting. Many knitters find charts easier to follow than written instructions once understood.
Your First Cable Hat Project
Begin with a simple pattern featuring one or two cable repeats. This allows focus on mastering the technique without overwhelming complexity. Many free beginner patterns include detailed photo tutorials for each step.
Cable Knitting Tips
Maintain even tension throughout to prevent distorted cables. Place stitch markers between pattern repeats to stay organized. If stitches slip off the needle, use a crochet hook to rescue them.
Remember that blocking your finished hat will even out stitches and enhance cable definition. This simple finishing step makes a remarkable difference.
Troubleshooting Common Issues
If cables appear uneven, check your tension consistency. Tight stitches before crossing can cause puckering. For twisted stitches, ensure you're crossing in the correct direction according to the pattern.
When in doubt, the knitting community offers tremendous support. Online forums and local yarn shops often provide helpful advice for troubleshooting specific issues.
The Pom-Pom Perfectionist

Creative Pom-Pom Crafting
Pom-pom making blends craft with artistic expression. Varying colors and textures transforms simple materials into charming creations. Each pom-pom develops unique character through slight variations in shape and density.
This tactile process offers meditative benefits, allowing focus on the rhythmic wrapping motions. Many crafters find the activity pleasantly absorbing and stress-relieving.
Perfecting the Technique
Quality pom-poms begin with proper wrapping technique. Using sufficient yarn and maintaining even tension creates full, round shapes. For beginners, pom-pom makers in various sizes help achieve consistent results.
After tying, carefully trimming the pom-pom creates a polished finish. Rotate while trimming to maintain spherical shape.
Versatile Decorative Elements
Pom-poms add playful accents to numerous projects. They enliven winter accessories, brighten home decor, or personalize gifts. Cluster arrangements create striking visual impact on blankets or wall hangings.
Consider color combinations that complement your projects. Monochromatic schemes offer elegance, while vibrant mixes create cheerful accents.
The Therapeutic Process
Beyond the finished product, many crafters value pom-pom making for its calming rhythm. The repetitive motions can induce a relaxed, focused state similar to meditation.
This makes it an ideal activity for stressful days or when seeking creative inspiration. The satisfying final fluff provides a tangible sense of accomplishment.
Advanced Techniques
Experiment with multi-colored wraps for ombre or striped effects. Varying yarn textures creates interesting surface variations. For special occasions, incorporate metallic threads or glitter yarns.
Layering different sized pom-poms creates dimensional interest. These can be assembled into garlands, mobiles, or statement jewelry pieces.
Read more about Easy Knitting Patterns for Hats


Hot Recommendations
-
*Best Sci Fi Books to Read in 2025
-
*How to Start a Reading Journal
-
*Guide to Collecting Vinyl Records by Genre
-
*Guide to Self Publishing Your Book
-
*Guide to Reading More Books
-
*How to Solve a Megaminx Fast
-
*Guide to Identifying Edible Plants While Hiking (Use Caution!)
-
*How to Solve a 5x5 Rubik's Cube
-
*Guide to Building Advanced Lego Structures
-
*How to Capture Star Trails Photography