How to Fix Common Knitting Mistakes
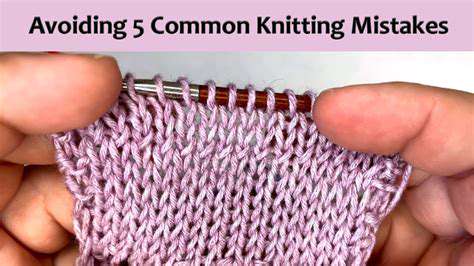
Understanding Garter Stitch
Every knitter encounters the garter stitch early in their journey—a timeless technique producing a textured, ridged fabric. Unlike more complex patterns, garter stitch simply requires knitting every row. Mastering this foundational stitch unlocks the ability to troubleshoot countless knitting dilemmas. While its simplicity appeals to beginners, even experienced crafters face unexpected challenges with this versatile stitch.
Variations in yarn handling or accidental stitch alterations can disrupt the stitch's uniformity. Spotting these irregularities quickly prevents minor issues from becoming major frustrations. Keeping a keen eye on your work's progression helps maintain the stitch's characteristic look.
Tension Issues
The rhythm of your hands significantly impacts garter stitch outcomes. Knitters often notice uneven sections where stitches appear tighter or looser than surrounding areas. Consistent hand positioning remains the unsung hero of professional-looking knitting projects. This becomes particularly noticeable when switching between yarn weights or needle types.
Periodic tension checks prove invaluable—pause occasionally to run your fingers across the fabric's surface. Many crafters find that using a simple stitch counter helps maintain regularity. Remember, the perfect tension often comes with practice rather than perfection.
Incorrect Stitch Pattern
Even in this straightforward stitch, pattern deviations occur. Accidentally introducing purl stitches or changing direction mid-row creates visible disruptions. These unintended variations often manifest as unexpected textures or holes in the fabric. Catching these mistakes early prevents extensive unraveling later.
Implementing simple tracking methods revolutionizes stitch accuracy. Color-coded stitch markers or row counters help maintain pattern integrity. Some knitters find that placing a distinctive marker after completing each repeat prevents accidental pattern shifts.
Yarn Considerations
Fiber choice dramatically affects garter stitch results. A bulky wool behaves entirely differently than a delicate cotton when worked in this pattern. The perfect yarn-needle pairing creates that ideal balance between stitch definition and fabric drape. Textured or novelty yarns might obscure the stitch's characteristic ridges entirely.
Swatching with different materials provides invaluable insight before committing to large projects. Always preserve yarn labels—their recommended needle sizes and care instructions prevent countless headaches. When in doubt, a slightly larger needle often improves stitch uniformity with tighter yarns.
Needle Selection and Project Foundations
Needle material and size influence every aspect of garter stitch execution. Bamboo needles grip yarn differently than slick metal ones, affecting tension. Investing time in proper project setup saves hours of corrective work later. An imperfect cast-on often telegraphs through the entire work.
Establishing good habits from the first stitch pays dividends. Many knitting instructors recommend practicing the cast-on and first few rows multiple times before beginning actual projects. This muscle memory development prevents common early-row mistakes that compound over time.
Unraveling Common Mistakes in Increases and Decreases
Gauge Consistency
Precision in stitch and row counts separates satisfying projects from frustrating ones. Variable gauge creates items that never quite match intended dimensions. In shaping work, even minor gauge fluctuations distort increases and decreases. Establishing and maintaining consistent gauge might seem tedious, but it prevents countless fitting issues. When gauge concerns arise, revisiting needle size often provides solutions.
Seasoned knitters know that gauge changes with mood, environment, and time of day. Creating a generous swatch (washed and blocked) reveals true gauge characteristics. This extra step prevents heartbreaking sizing surprises after completing labor-intensive pieces.
Strategic Placement of Shaping
Shaping transforms flat fabric into dimensional garments, but misplaced increases create awkward bulges. Each decrease or increase must serve both functional and aesthetic purposes. Concentrated shaping in one area produces disproportionate results that no amount of blocking can correct.
Implementing a stitch mapping system prevents placement errors. Some knitters use colored pins to mark intended shaping points before beginning. This visual guide ensures symmetrical distribution of increases and decreases across garment pieces.
Stitch Selection for Shaping
Not all increase methods complement every stitch pattern equally. A lifted increase blends seamlessly into stockinette but might disrupt garter stitch's rhythm. Choosing shaping techniques that enhance rather than fight your base stitch creates professional results. Certain decorative decreases actually become design features when placed intentionally.
Building a personal stitch dictionary helps match techniques to projects. Many knitters keep sample swatches demonstrating how different increases/decreases interact with various patterns. This reference becomes invaluable when modifying patterns or designing original pieces.
Pattern Interpretation
Even the most meticulously written patterns leave room for interpretation. Knitting charts and written instructions sometimes convey slightly different information. Cross-referencing multiple instruction formats often clarifies ambiguous shaping directions. When uncertainty arises, consulting pattern errata or online knitting communities prevents costly mistakes.
Developing a consistent marking system for patterns reduces errors. Highlighting shaping sections in contrasting colors helps maintain focus during complex sequences. Some knitters rewrite confusing instructions in their own words for clearer understanding.
Read more about How to Fix Common Knitting Mistakes


![History of [Specific Toy Type, e.g., Action Figures] Collecting](/static/images/34/2025-05/TheDigitalAgeandtheModernCollector.jpg)


Hot Recommendations
-
*Best Sci Fi Books to Read in 2025
-
*How to Start a Reading Journal
-
*Guide to Collecting Vinyl Records by Genre
-
*Guide to Self Publishing Your Book
-
*Guide to Reading More Books
-
*How to Solve a Megaminx Fast
-
*Guide to Identifying Edible Plants While Hiking (Use Caution!)
-
*How to Solve a 5x5 Rubik's Cube
-
*Guide to Building Advanced Lego Structures
-
*How to Capture Star Trails Photography