Guide to Building Gundam Models

Choosing the Right Scale
Selecting the perfect scale for your first Gundam kit requires careful thought. Various scales translate to different finished sizes, influencing both the assembly complexity and display impact. For newcomers, the 1/144 scale often proves ideal—its manageable parts count and compact size reduce frustration while still delivering satisfying results. These kits also allow collectors to amass diverse models without excessive space or budget demands. Conversely, 1/100 or 1/60 scale kits showcase breathtaking detail but demand advanced skills and significant time investment.
Evaluate your workspace and schedule honestly. Limited time? A 1/144 kit lets you experience the joy of completion quickly. Craving depth? Larger scales reward patience with museum-quality displays. There's no universal best choice—only what aligns with your circumstances and aspirations.
Understanding Gundam Types
The Gundam universe boasts hundreds of distinctive mobile suits, each with compelling backstories and design philosophies. Identifying which characteristics resonate with you—whether it's a unit's legendary battlefield performance or its sleek aerodynamic silhouette—transforms kit selection from overwhelming to exhilarating. Some models emphasize heavy artillery, while others showcase revolutionary mobility systems or iconic visual trademarks.
Dive into Gundam lore through anime series, art books, or collector forums. Recognizing why certain designs became legendary will make your first build more meaningful. This preparatory research often sparks unexpected passions—you might discover an affinity for obscure prototype units or fan-favorite mass-production models.
Considering Your Skill Level
Honest self-assessment prevents discouragement. Seasoned modelers recommend starting with High Grade (HG) kits—their forgiving part tolerances and clear instructions provide ideal training while still producing impressive results. Complex Master Grade or Perfect Grade kits, though tempting, can overwhelm with tiny components and advanced techniques like undergating or polycap assemblies.
View your first kit as a learning platform rather than a masterpiece. Simple builds teach fundamental skills like nub removal and seam line management—foundations that make advanced projects achievable later. Many enthusiasts find their early, imperfect builds remain sentimental favorites despite later technical accomplishments.
Budget and Availability
The Gundam hobby accommodates various financial commitments. Establishing clear spending parameters early prevents impulse purchases that might gather dust unfinished. Entry-level HG kits typically cost $20-$40, while premium kits can exceed $200. Remember to factor in essential tools—precision nippers and hobby knives add $30-$50 initially.
Scarcity affects certain kits dramatically. Limited edition releases or discontinued molds sometimes command triple their original price. Check reputable retailers like USA Gundam Store or HobbyLink Japan for stock alerts. Local hobby shops occasionally have hidden gems at reasonable prices—it's worth building relationships there.
Researching and Choosing Your Favorite Design
This is where passion meets practicality. Spend hours—yes, hours—poring over Dalong.net's comprehensive photo reviews or watching build videos on YouTube. Notice how different kits handle color separation (does it need paint?) or articulation (can it hold dynamic poses?). These details separate merely good kits from truly great ones.
Let your heart guide the final decision. That flutter of excitement when you imagine a particular model on your shelf? That's the one. This emotional connection sustains motivation during challenging assembly phases and makes the completed build infinitely more rewarding.
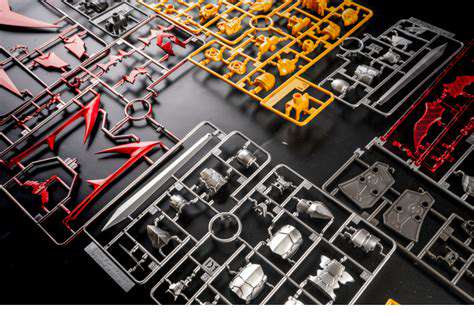
Mastering the Art of Construction: A Step-by-Step Guide
Planning Your Gundam: Conceptualization and Design
Successful builders treat instructions as sacred texts. Study them thoroughly before touching any plastic—note color callouts, optional parts, and assembly sequences. Identify steps requiring special attention, like fragile antennae or complex joint assemblies. This mental rehearsal prevents costly mistakes.
Gather all necessary tools within arm's reach: nippers, hobby knife, sanding sticks, and a clean workspace. Consider investing in a part organizer—many builders use pill organizers or fishing tackle boxes to sort components by step number. This preparation transforms chaotic frustration into smooth, meditative progress.
Assembling the Core: Framework and Structure
The inner frame dictates everything. When snapping together polycaps and joints, test mobility frequently—a stiff joint now becomes an immobile one after armor attachment. Use the press-fit then cement method: ensure perfect alignment before applying plastic cement for permanent bonds. This approach prevents the heartbreak of misaligned components.
Develop a quality control ritual: after each major subassembly (legs, torso, arms), inspect from all angles under bright light. Check for seam lines, ejector pin marks, or stress marks from improper cutting. Addressing these issues immediately prevents compounding errors later.
Adding the Finishing Touches: Details and Decoration
Panel lining elevates models dramatically. Use pour-type markers for crisp, capillary-action lines in recessed details. For raised edges, try the dry brush technique—lightly dragging a flat brush with minimal paint creates realistic edge wear. Remember: less is more with weathering—a few strategic scratches tell a better story than uniform grime.
Topcoating is the final magic trick. Matte finishes hide imperfections and unify colors; gloss coats make decals disappear under the surface. Always test finishes on spare parts first—some paints react unpredictably with certain plastics. This protective layer ensures your masterpiece withstands handling and display for years.
Read more about Guide to Building Gundam Models


![Top 10 Hiking Trails in [Region/Country]](/static/images/34/2025-06/GreatSmokyMountainsNationalPark3AABiodiversityHotspot.jpg)


Hot Recommendations
-
*Best Sci Fi Books to Read in 2025
-
*How to Start a Reading Journal
-
*Guide to Collecting Vinyl Records by Genre
-
*Guide to Self Publishing Your Book
-
*Guide to Reading More Books
-
*How to Solve a Megaminx Fast
-
*Guide to Identifying Edible Plants While Hiking (Use Caution!)
-
*How to Solve a 5x5 Rubik's Cube
-
*Guide to Building Advanced Lego Structures
-
*How to Capture Star Trails Photography