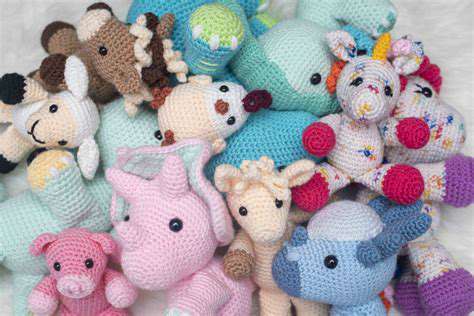
Easy Crochet Patterns for Amigurumi
Pro tip: Use stitch markers to track rounds. Many beginners lose count when working in continuous spirals. A scrap of contrasting yarn or commercial stitch marker saves frustration.
Creating the Body
Most amigurumi bodies begin with a magic ring—this technique creates a tightly closed center. After establishing the foundation, you’ll alternate between increase rounds (adding stitches to make the piece wider) and even rounds (maintaining stitch count). Proper shaping requires careful attention to pattern instructions. Some designs incorporate subtle curves by strategically placing increases.
When stuffing, use small amounts of fiberfill at a time. Overstuffing distorts the shape, while understuffing creates limp results. A chopstick helps position stuffing in narrow areas like necks or limbs.
Adding Limbs
Limbs typically get crocheted separately and attached later. Leave long tails when finishing limbs—these become your sewing threads. Position pieces temporarily with safety pins before permanent attachment. Symmetry matters most here—step back frequently to check alignment.
Crafting the Head
Heads often use the same techniques as bodies but may include special shaping for features. Some patterns create snouts or cheeks through strategic increases. Ears might be worked directly onto the head or made separately. Facial expression makes or breaks an amigurumi’s charm—take time perfecting eye placement.
Adding Details and Features
Safety eyes provide professional results but require pre-planning (they install before closing the head). For child-safe options, embroider features using yarn or floss. Simple straight stitches can create surprisingly expressive faces. Consider the character’s personality—wide-set eyes feel innocent, while close-together eyes appear mischievous.
Finishing Touches and Assembly
Use mattress stitch for nearly invisible seams. When closing openings, gradually decrease stuffing as you sew to avoid lumps. A well-made amigurumi should withstand gentle play—reinforce stress points like limb attachments with extra stitches. Finally, use a lint roller to remove stray fibers for a polished look.
Deep breathing exercises anchor many grounding techniques by directly influencing the body’s stress response. Slow, deliberate breaths stimulate the vagus nerve, triggering relaxation. This physiological shift can interrupt panic cycles within minutes. Regular practice makes the technique more effective during actual anxiety episodes.
Creating Amigurumi Accessories and Toys
Getting Started with Amigurumi
Amigurumi transforms simple yarn into whimsical companions. The magic lies in watching flat stitches become dimensional forms. Beginners should start with single-color patterns to master shaping before tackling complex colorwork. Many find the repetitive motions meditative—a bonus mental health benefit.
Invest in quality tools—ergonomic hooks reduce hand fatigue during long sessions. Keep a notebook to record modifications; even simple patterns can evolve into signature designs. Your first project needn’t be perfect—each stitch builds muscle memory.
Understanding Basic Stitches
The invisible decrease (inv dec) separates amateur from professional results. This technique hides the typical “step” created by standard decreases. Similarly, the yarn-under (rather than yarn-over) method produces tighter, X-shaped stitches ideal for amigurumi. These small refinements elevate finished pieces.
Choosing Your Yarn and Hook Size
Consider project purpose when selecting yarn. Toys for young children benefit from machine-washable fibers. Display pieces can use delicate natural fibers. Hook size affects durability—slightly smaller hooks than recommended create denser, sturdier fabric.
Designing Your Accessory
Sketch ideas before starting—even rough doodles help visualize proportions. Nature provides excellent inspiration—study animal anatomy or plant structures. For wearable items, create mockups with cheaper yarn to test sizing.
Crafting Techniques for Amigurumi
Surface crochet adds decorative details like stripes or scales. Embroidered accents bring depth—try French knots for textured eyes or whiskers. Blocking transforms wonky pieces—lightly steam stubborn curls into shape. Always wash hands before working with light-colored yarns to prevent discoloration.
Read more about Easy Crochet Patterns for Amigurumi


![Top 10 Hiking Trails in [Region/Country]](/static/images/34/2025-06/GreatSmokyMountainsNationalPark3AABiodiversityHotspot.jpg)